Cargando el producto…

Precio de origen
$ 59.124
+ flete y aranceles — se calculan al cotizar
Compra protegida
Puerta a puerta
Aduana incluida
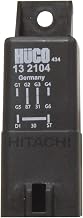
Product description Glow Plug Control Module Installation Manual (Safety Warning: Improper operation may cause circuit damage, fire, or device failure! Follow all steps strictly) Pre-Installation Preparation Verify Product Compatibility Match the glow plugs and control module using the vehicle’s OE number + model (engine type/cylinder count). Do NOT rely on visual appearance alone. Tools and Materials Multimeter (for resistance measurement) Insulated gloves, electrical contact cleaner (if oxidation is present) OEM-specified glow plugs (as replacements) Installation Steps 1.Inspect Glow Plugs Measure Resistance: Test all glow plugs (4 for 4-cylinder, 6 for 6-cylinder, 8 for 8-cylinder). Normal Condition: All glow plugs should show similar resistance values (typical range: 0.1–2Ω; refer to OEM specifications). Fault Handling: Replace any glow plug with abnormal resistance before proceeding. 2.Check Control Module Connector Visual Inspection: Ensure no corrosion, aging, or physical damage on the connector. Cleaning: Clean oxidized contacts with electrical contact cleaner. Do NOT proceed if the connector is damaged—replace it first. 3. Install Glow Plug Control Module Mount the Module: Align the module with the mounting bracket and temporarily secure it with screws (final tightening after testing). Connect the Harness: Ensure the connector is fully seated and locked. Loose connections may cause overheating! 4.Power-On Test & Monitoring Start the Vehicle: Check if the preheating indicator on the dashboard functions normally. Monitor for 3–10 Minutes: Use an infrared thermometer or touch (with gloves) to check: Abnormal heat at the module connector or wiring. Short circuits to ground (re-test with a multimeter if needed). Critical Faults: If overheating occurs, immediately disconnect power and verify glow plug compatibility. Incorrect glow plug resistance doubles current, risking wire harness meltdown! 5.Finalize Installation Secure the Module: Fully tighten all screws to prevent vibration-induced loosening. Recheck Connections: Confirm the connector is firmly locked and free from play. Key Precautions Glow Plug Replacement: If replacing glow plugs, ensure resistance matches OEM specifications. Deviations will: Disable module protection features Cause wiring harness overheating and fire Avoid Short Circuits: Prevent glow plugs from contacting the engine block during installation. Post-Installation Check: Re-test glow plug resistance and connector integrity within 24 hours of first use. See More
Agregás al carrito
Sumás este y otros productos que querés traer.
Cotizás el envío
Calculamos flete aéreo y aranceles a Argentina.
Confirmás y pagás
Un asesor te contacta con el link de pago.
Lo recibís en casa
Tracking en tiempo real. Aduana incluida.
Los mejor puntuados del mismo tipo de producto
Mismo tipo de producto y precio parecido